Zoospore collection system for nursery plants
Version 10/6/2020
Various methods can be used to detect root-infecting Phytophthora species in plants. We describe a method for testing leachate from container grown plants in our BMPs for Producing Clean Nursery Stock pages. The most practical method for monitoring large numbers of plants in a nursery involves capturing water that drains from the bottom of containers during irrigation and baiting that water with a Phytophthora-specific bait such as a green pear. This system allows for non-destructive testing of blocks of plants without requiring that the plants be moved from the benches upon which they are situated. Such testing can be done on a spot basis during an inspection, but more importantly, can be run by the nursery on an ongoing basis to monitor plants for infection. Drought tolerant plants growing in the nursery with frequent irrigation and low evaporative demand will commonly not show obvious top symptoms even when root rot is extensive.
Three pieces of equipment are needed to run this test:
- a zoospore collection vessel, which is a container that is designed to accumulate zoospores from the large volume of water leached from irrigated nursery plants;
- a collection system that is placed under a nursery bench and serves to capture and direct leachate from irrigated nursery plants on the bench into the zoospore collection vessel below the bench;
- an irrigation wand with a flow control that allows precise irrigation of individual containers.
This page discussed the construction of the first two pieces of equipment and how to set up the equipment to run a test.
Zoospore collection vessel (ZCV)
The design of this device is based on the behavior of Phytophthora zoospores and other inoculum leached from infected container plants. Zoospores swim upward, so they concentrate near the top of a water column. Root fragments and other debris that may contain sporangia or oospores either tend to float or settle to the bottom of a water column. To maximize zoospore concentration around the pear during the leaching period, a relatively tall and narrow container is needed. Phytophthora zoospores typically don't swim further than 10 cm in a static system, and chemical gradients that attract zoospores to the bait are likely limited to even shorter distances, so a small surface area is desirable. The vessel described below has an inner diameter of about 20 cm, so the edge of a pear floating near the center would be 10 cm or less from the vessel wall.
A large amount of water may be leached out of irrigated plants when running the leachate baiting test, so the vessel needs to concentrate inoculum from this large volume of water to optimize detection of Phytophthora inoculum by the bait. To accomplish this, excess water drains from the middle portion of the water column rather from the top or bottom where inoculum is most likely to accumulate. For this to occur, the vessel outflow needs to be sized large enough to accommodate the maximum amount of water inflow so all excess water will exit through the drain rather than flowing over the top rim of the vessel. A 1 inch (2.54 cm) inner diameter (ID) PVC pipe has sufficient flow to handle peak drainage from a set of plants covering about 10.8 sq ft (1.5 sq m) of bench. This is enough area to bait the maximum number of plants recommended in the test protocol.
The vessel we describe here may not be the most efficient possible collector. However, from tests we have conducted, it is clearly a fairly efficient design and has been used to detect Phytophthora inoculum in leachate water volumes ranging from less than 2 gal (7.6 L) (i.e., less than full vessel) to about 76 gal (288 L). It fits under nursery benches that meet the Phytophthora BMP standards and is made of readily procurable, relatively inexpensive, durable, and cleanable components that are easy to put together with simple tools. The insulated vessel wall is a plus, as it helps prevent excessive heating of the collected leachate in sunny conditions and maintains a more constant water temperature during the test. The flat spot at the base of the vessel (where the spigot is located) also simplifies installing the PVC fittings. If tests are conducted using this standard vessel, it is easier to make direct comparisons between results from different tests conducted following the leachate test protocol. Instructions for making a mini ZCV are given below.
Materials needed
Note: ID=inner diameter, FPT=female pipe thread, MPT=male pipe thread- 2 gallon (7.6 L) insulated plastic beverage jug with an internal depth of 12 inches (30 cm), inner diameter about 7.8 inches (20 cm). We use an Igloo Sport 2 Gallon Cooler / Jug / Beverage container.
- Two 1 inch (2.54 cm) ID PVC slip-slip elbows
- One 1 inch (2.54 cm) PVC FPT-F slip elbow
- One 1 inch (2.54 cm) PVC MPT-F slip coupling
- One 1 inch (2.54 cm) ID rubber gasket (or rubber O ring)
- Two sections of 1 inch (2.54 cm) PVC pipe - preferably schedule 40: one piece 7.25 inches (18.5 cm) long and one about 2 inches (5 cm) long. You can use schedule 200 in place of schedule 40, but the joints on the short bottom pipe may tend to loosen up over time. All slip connections are held together by friction only.
- A plastic cable tie, 7 inches (18 cm) actual length minimum, preferable UV-stabilized. This is used to make a pear exclusion device that keeps the pear bait from blocking the outflow inside of the vessel.
- Teflon pipe joint tape for the threaded PCV fitting connection.
Note - this design is a bit simpler and uses fewer pieces than our originally-posted design. It also provides a bit more free space at the bottom of the ZCV, which reduces the chance of the pear bait getting wedged between the pipe and the wall of the vessel.
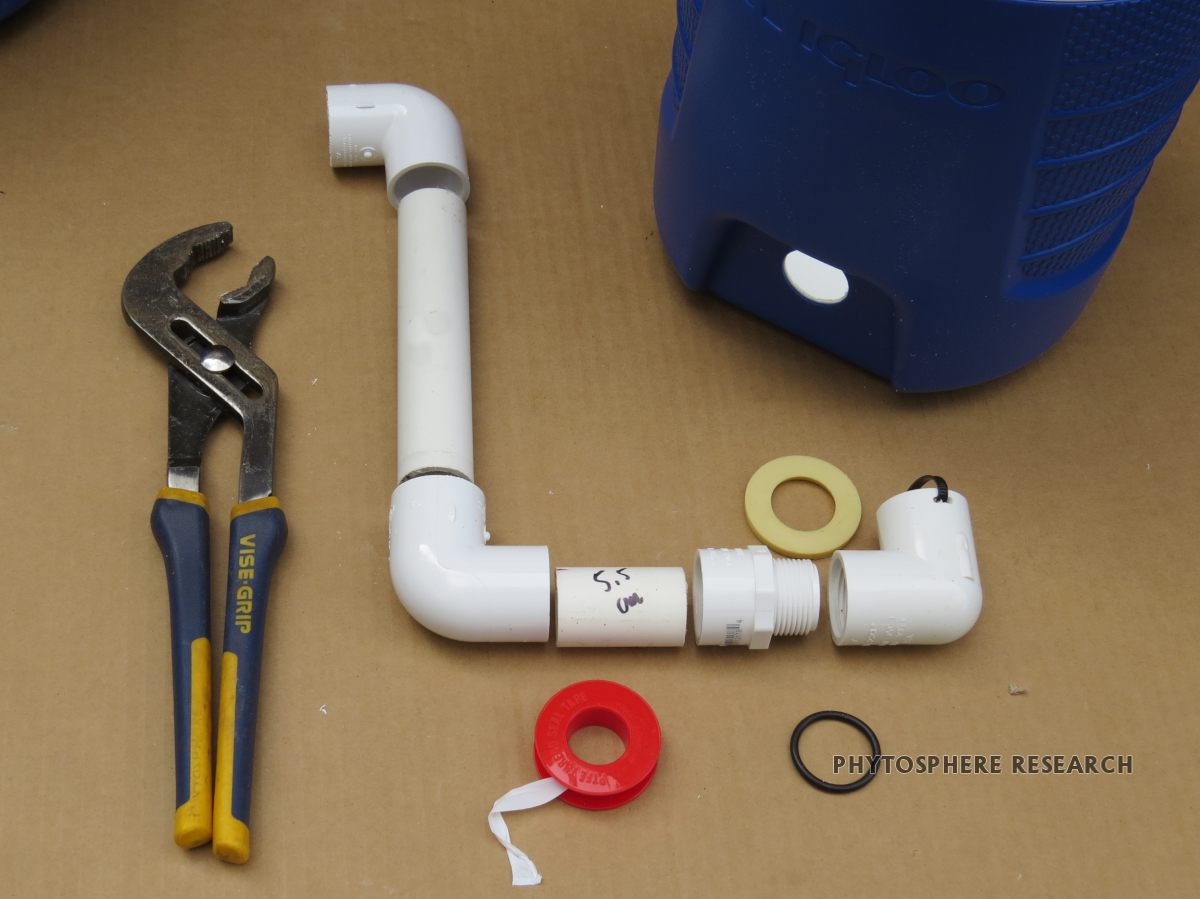 Figure 1. PVC fittings and pipe sections (all 1 inch diameter) needed for zoospore collection vessel. Existing spigot has been removed from the 2 gallon beverage container and a larger hole has been made. The pear exclusion device (cable tie) has been attached to the thread-slip elbow. Both a flat rubber gasket (off-white) and O-ring (black) are shown; only one of these is needed. Adjustable pliers and Teflon tape also shown.
Tools needed
- 1.25 inch (3.18 cm) diameter hole saw - this diameter should make a hole just large enough to thread in the male end of the 1 inch MPT coupling
- drill motor or drill press. If using a drill motor, you will need some wood blocks to fit in tightly across the bottom of the vessel, as shown in the video
- adjustable pliers (Channellocks or similar) to help tighten the threaded coupling
- saw or PVC cutter to cut the pipe sections
What to do
See this video to see how to construct this vessel. The current the video has been updated to show construction of the newer ZCV design. The main steps are as follows:
- the existing spout is removed from the cooler.
- a larger hole is drilled out around the existing hole to accommodate the threaded coupling. Make sure the bottom of the hole is not too close to the bottom of the vessel or the slip-thread elbow within the vessel will not fit. The new hole should be centered around the spigot hole, or just slightly above the center of that hole.
- make several marks with a permanent marker on the inside wall of the ZCV at 10 cm from the bottom. It is also helpful to scribe a line at this level with a sharp implement so you won't lose the mark if the ink fades. This is somewhat easier to do before you install the PVC pipes. The marks show the level to drain the water to after a test before transfer into a 1 gallon (3.8 L) zip closure bag.
- a pear exclusion device is made by threading a cable tie through narrow slits drilled in the slip end of the slip-thread elbow that is inside of the ZCV (Figures 3, 4).
- assemble the pieces as shown in the video. The PVC MPT-F slip coupling will be threaded directly into the FPT end of the slip-thread elbow. All slip fittings can be simply pressed in as there is very little pressure in this system. Depending on the height of the hole at the bottom, you may need to adjust the length of the long PVC pipe slightly. The target is to leave the water level in the vessel about 2.5 inches (6 cm) below the rim to prevent any overflow out the top under high inflow conditions. However, you can also tilt the drain spout to lower the effective drain height if it is too high.
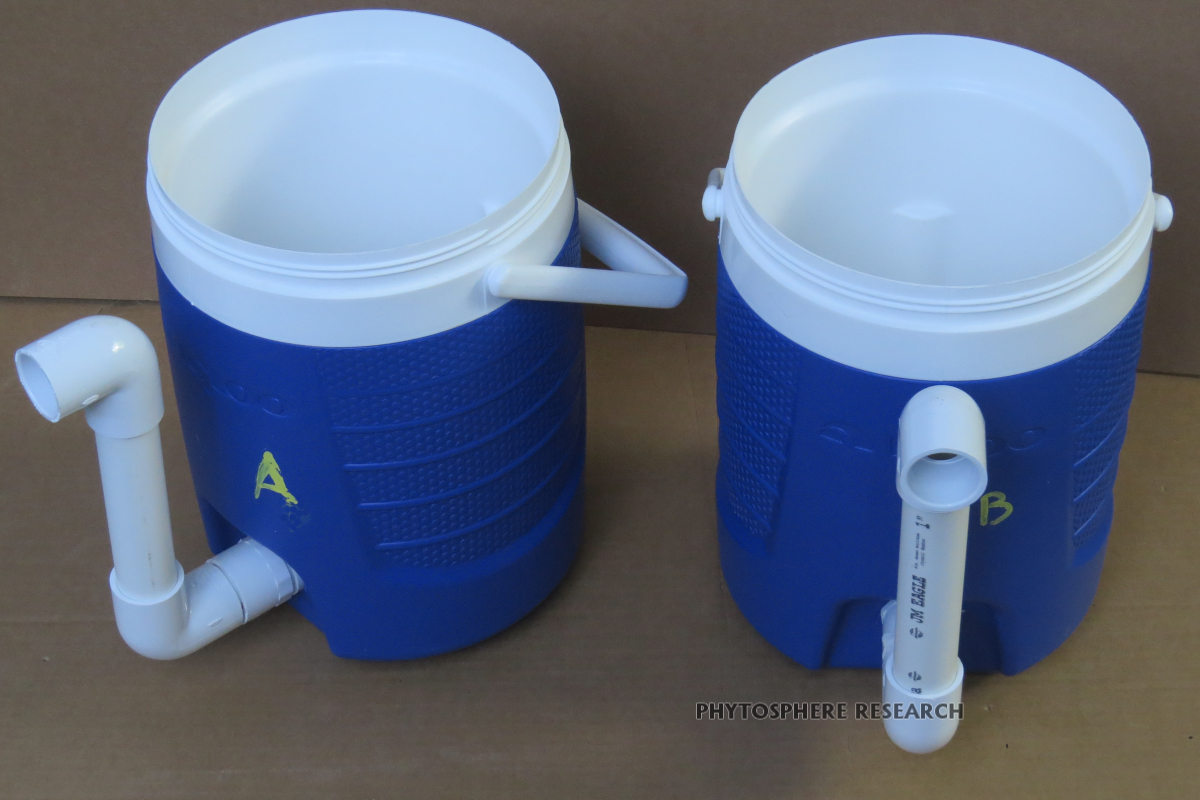 Figure 2. Exterior view of two assembled zoospore collection vessels. Labeling each vessel on the outside can be helpful for tracking when conducting tests.
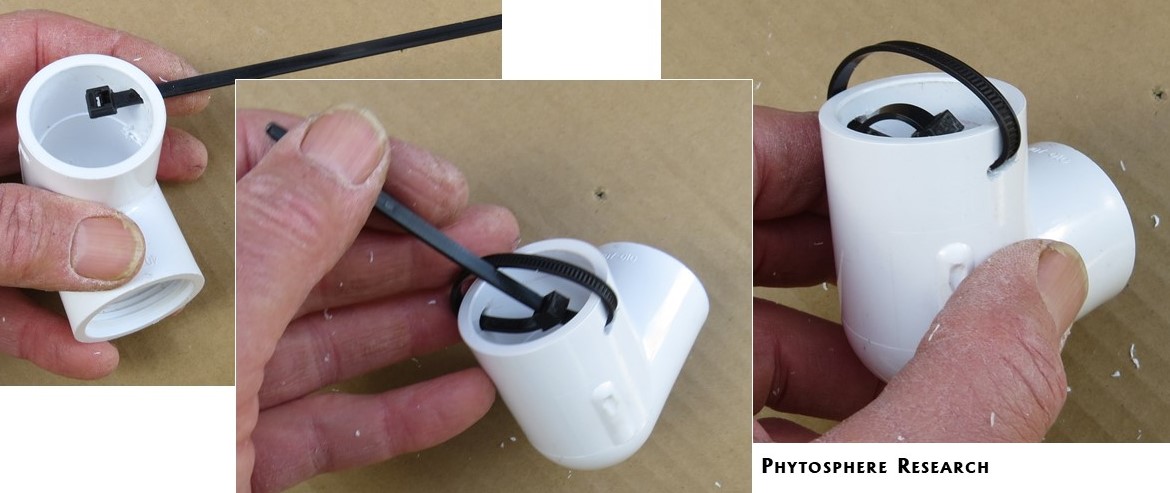 Figure 3. After drilling two slots on opposite sides of the slip fitting end of slip-FPT elbow, a cable tie is threaded through to form a pear exclusion device that keeps the pear bait from obstructing the drain during the test. The end block and the free end of the cable tie are kept within the elbow to prevent them from creating wounds in the pear.
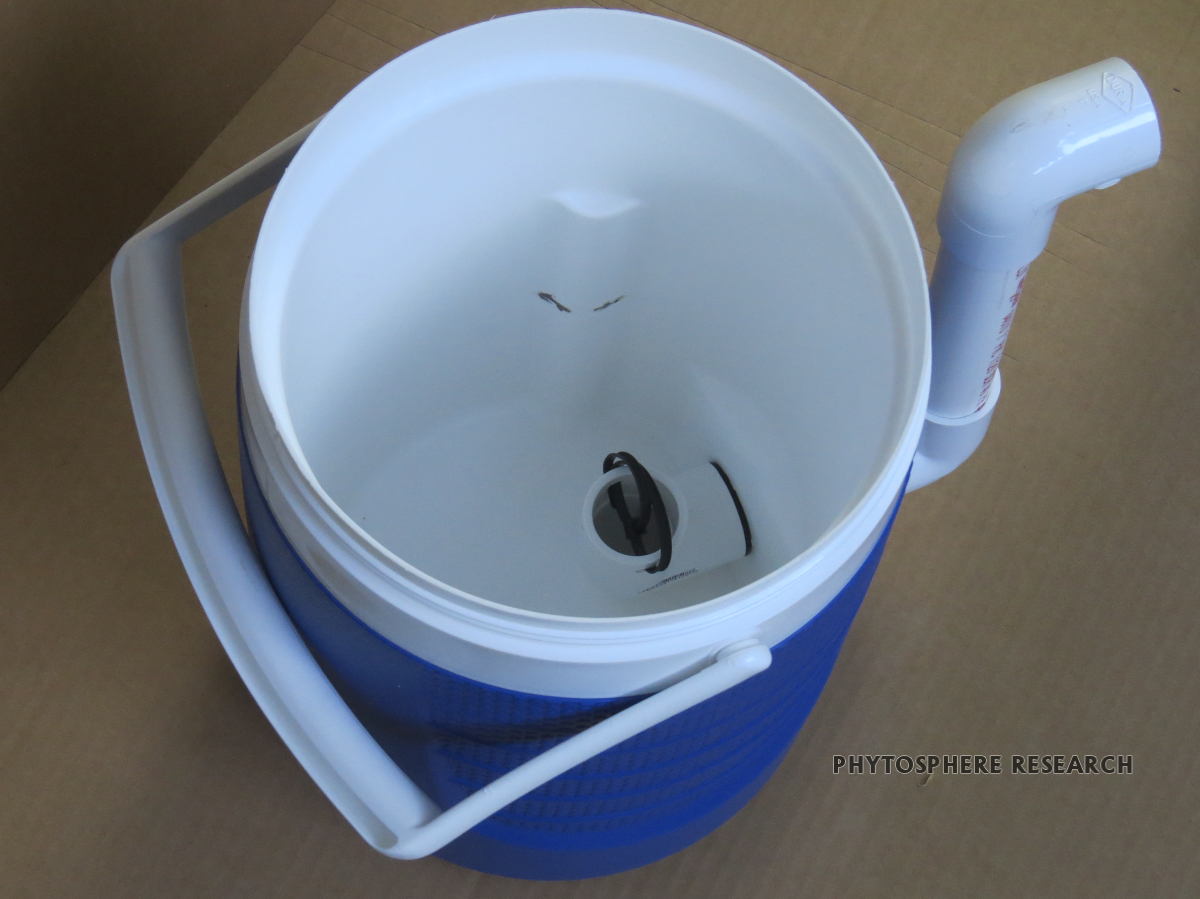 Figure 4. Top view showing the inside of the assembled zoospore collection vessel. Note rubber O-ring between inside wall and elbow and pear exclusion device (black cable tie) over the elbow opening. Black lines visible on one of the internal ribs (10 cm above bottom) indicate the level to which water is drained before transferring it to a 1-gallon plastic zip-closure bag (see leachate test protocol).
Collection system (universal fit)
The collection system consists of the following components:
- One or more collection sheets made of vinyl flashing with grommeted holes in the corners
- Cords and hooks that suspend the collection sheets beneath the nursery bench
- Dams (2 per collection sheet) made of slitted lightweight PVC pipe that attach to the downslope edge of the collection sheet
- A flow deflector (or water slide) made of vinyl flashing that attaches between the dams to provide a smooth flow of water into the zoospore collection vessel
Materials and construction details for making a standard universal collection system are described below. The universal fit design is preferable if testing will occur in multiple nurseries or with benches of varying sizes because this collection system can be made to fit many different situations. It may not be the simplest or most efficient design for a specific bench. For repeated tests in a nursery with uniform benches, you may want to modify the collection system dimensions to achieve a better fit. It may also be more convenient to mount the collection system on a cart or frame that can be slipped under the benches.
Materials needed
- vinyl flashing - 20 inch (51 cm) wide, or as wide as available. We originally used Amerimax 205008W Duraflash 20 inch x 50 foot white vinyl flashing. This material was no longer available at the time of this update. The closest alternative we have identified is York 5994033 18 inch x 50 foot white vinyl roll flashing. Each sheet of a standard system uses a 52 inch (132 cm) length of vinyl roll flashing, which will work on benches up to about 48 inches (122 cm) wide; a 50 ft roll will make 11 complete sheets.
If you have narrower benches or struts under the bench that limit the placement of the collection sheet, modify the sheet length to provide a better fit. A single sheet will collect leachate from an area slightly less wide than the sheet width, but multiple sheets can be mounted in series to collect leachate from a wider area. For testing large container stock, it may be necessary to combine two or occasionally three sheets to test a set of plants, so consider making at least two collection sheets for each zoospore collection vessel. We have used up to three 20 inch (51 cm) width sheets in combination, which works for a length of about 54 inches (138 cm). Having spare clean collection sheets also allows you to set up additional tests without having to clean and sanitize sheets between each test. Vinyl flashing strips are also used for making the flow deflectors. Vinyl flashing is pretty useful for various applications, so you can probably find good uses for any leftover material you have.
- plastic grommets - 4 per collection sheet. We prefer Coghlan's 706 Snap 'n Tap Grommets (8 per pack). We have used the Camco 51046 Plastic Tap-In Grommets as well, but these were more brittle. The Camco grommets we used also had excessive amounts of blue dye that kept leaching out of the plastic. If you have Camco grommets, soak them in isopropanol before use to leach out excess dye.
- plastic spring cord locks - 4 per vinyl flashing sheet, 12 total for each full system. These vary widely in cost, but in shopping for them, make sure that the hole will be large enough to accommodate two strands of the nylon cord you will be using. Use cord locks that have a stainless steel spring. Other metal springs tend to corrode when exposed to bleach solutions, which are used to sanitize the equipment. Most recently, we have used Primoloc Cord Locks (10mm x 7mm x 20mm) from Sgt.Knots.
- small S hooks - 4 per collection sheet. Available at hardware stores or online. We have used hooks that are 1.25 inch (3 cm) long and made of 0.125 inch (3.2 mm) diameter steel. Zinc-coated steel is subject to corrosion from bleach so stainless steel is preferred. You will need one end open and one end closed, so you can buy either the open or closed S hooks and plan to bend one end open or closed as needed.
- braided nylon cord - 0.125 inch (3.2 mm) diameter, or similar; make sure that two cords will fit in your cord locks. We have also used paracord, but the ends are more difficult to sear cleanly. For each full system, you will need 8 pieces, each about 14 inches (36 cm) long, for a total of about 9.3 ft (2.90 m). You will save a lot of trouble by getting the braided cords rather than cheaper twisted cord that unravels and frays readily.
- 1 inch diameter class 200 (thin walled) PVC pipe - two lengths, each about 20 inches (51 cm) long.
- Optional - needed only for linking multiple sheets in series - flat PVC molding, 1/4 inch (0.6 cm) thick and at least 3/8 inch (1 cm) wide (available at home improvement stores). The molding is easy to cut to the desired size (3/8 x 1.25 inch, or about 1 x 3.2 cm). This is used to make what is essentially a single-hole toggle button that attaches each nylon cord to the collection sheet. You could substitute a plastic toggle button (as used for garments) or some other piece of plastic into which you can drill a hole large enough to accommodate the cord if you can find the right size (less than 1 cm diameter so it will fit through the grommets and no less than about 2 cm long).
The toggle button-style cord end allows sheets to be coupled together in series. In our original design, we used hooks on both ends of the cords and made a separate L-shaped connector from PVC molding to link sheets together (see Figure 18). The newer design uses one rather than two hooks per cord and does not require the separate link pieces.
Tools needed
- scissors or a utility knife to cut the vinyl flashing and nylon cord
- square or straight edge at least 20 inches (50 cm) long
- drill and drill motor or sharp steel punch and mallet to cut the holes (about 0.5 inch or 12-13 mm diameter) in the flashing for the grommets. The vinyl flashing is too thick to be cut by the plastic grommets.
- drill motor and a drill bit (no more than 0.161 inch diameter=4.1 mm or #19 drill) to drill center holes in the PVC cord end toggles (if making the removable/linkable cords).
- measuring tape
- heat source to sear the ends of the cut nylon cord
- fine tooth backsaw or similar thin fine-toothed saw. This is needed to cut the PVC pipe to length and cut slits in it, as well as to cut PVC molding. If you have one available, a bandsaw with a fine-tooth blade can be used to cut the PVC pipe to length and cut the molding pieces. The slit in the PVC pipes used for dams may also be made with a thin (1 mm thick) circular saw blade using a table saw.
What to do (making a single collection sheet)
- Cut the flashing to length: Unfurl the flashing. If there is a paper label on it, use a razor blade scraper to carefully peel off the label or cut off the bit with the label on it and use it for something else. Use a square to mark a straight line and cut the vinyl flashing to a length of 52 inches (132 cm) or a different length that you have determined works for your benches.
- Install grommets: Cut or punch holes in each corner of each sheet. The holes are centered 1-3/8 inch (3.5 cm) from the edges at the corners. If you are making multiple sheets, it will be faster to mark the holes by making a template (e.g., from a scrap of vinyl flashing) that lines up on the corners. Holes can be made with a sharp metal punch that matches the grommet diameter (0.5 inch=12 mm ID for the grommets specified above). You can drive the punch through the vinyl with a mallet, using a soft piece of wood behind the vinyl. It is also possible to chuck the punch into a drill motor to make the holes. Using a piece of cardboard (or similar firm material with some resilience) underneath the flashing, use the drill motor on low speed to cut the hole (Figure 5). Holes can also be made with a 0.5 inch (12 mm) drill, but the vinyl needs to be supported, otherwise it may rip. To do this, clamp the vinyl between 2 thin pieces of scrap wood, and using a template to align the hole, drill through wood/vinyl/wood sandwich. If the hole is a bit small, use a tapered 0.5 inch diameter round file to enlarge the hole to the necessary diameter. Note: you can make additional holes along the short edge to make the sheet adjustable for additional lengths when they are used in series.
- Make a partial crease: Fold a partial crease in the center of the long edge of each sheet. The crease should extend about 1/3 of the way across the sheet (Figure 6). The fold will create a shallow V-shaped depression in the glossy side of the flashing; this is the side that will collect the leachate. It is easier to line up the corners to make the crease before installing the grommets.
- Snap the plastic grommets into the holes in the corners of each sheet. We put the rounded side of the grommet on the glossy side of the sheet. A simple tool made from a 1/2 inch PCV tee and a short piece of 1/2 inch PCV pipe can be used instead of a hammer to snap the grommets together (Figure 7).
- Make and attach cords to grommets: For each sheet, cut 4 lengths of the nylon cord, each about 14 inches (36 cm) long. Sear the cut edges.
- Tied-on cords: If you will only be using single sheets, you can loop one end of each cord into each corner grommet. If you want to be able to link multiple sheets in series for larger collection area, at least two holes should be fitted with removable/linkable cords described below. For sheets that can be used alone or as an upslope end sheet in a linked set of sheets, attach cords to the two corners on the uncreased long end of the sheet. For sheets that can be used alone or as a downslope end sheet, the cords will be attached to the corners on the long end with the crease. For a sheet that can be used in the middle of a 3 sheet array, do not attach any of the cords; use four removable cords.
- Removable/linkable cords: These cords can be attached or detached from the sheets without tying or untying knots and can also be used to link two sheets together at the grommet holes.
- Make the PVC cord ends: If using PVC molding that is 3/4 inch (2 cm) wide, use a band saw with a fence or similar to rip a section of the molding in half lengthwise (Figure 8). Each PVC cord end (=toggle button) will be 1.25 inches (3.18 cm) long, so a 13 inch long (33 cm) piece of molding ripped in half lengthwise will make 20 cord ends. Mark and drill holes at 1.25 inch (3.18 cm) intervals on the center line along each 0.5 inch wide piece of molding, starting 5/8 inch (1.7 cm) from the end. The holes should be large enough to slip your nylon cord through but no more than 0.161 inch diameter (4.1 mm or #19 drill). Use a fine file or sandpaper to clean up any rough edges after this step. Once the holes have been drilled, cut the PVC into pieces at the midpoint between each of the holes. This will yield a number of PVC pieces 1.25 inches (3.18 cm) long, each with a hole in the center.
- Make a loop in the cord with the cord lock. Either slip each of the free ends or slip a doubled loop of cord through the cord lock as shown in Figure 9.
- Attach the PVC cord end to the cord. Insert one end of the nylon cord through the hole in the PVC cord end piece. Tie a knot at the end of the cord to keep the PVC cord end from falling off. Knot the other end of the cord at this point so the cord lock cannot slip off (Figure 9.).
- Attach the S hook. Put an S hook on the loop in the cord and pinch it closed with a pair of pliers or a vise to keep it attached to the cord (Figure 9).
- To attach the removable/linkable cords: Starting from the top (glossy surface) of the sheet, push the end knot through the grommet, then push the PVC cord end through; the knot and PVC end may not fit through the hole at the same time as the knot. If linking two sheets, push the knot and cord end through the grommet on the upper (upslope) sheet first, then through the lower (downslope) sheet's grommet (Figure 10).
Start by looping the cord through the grommet and slipping both ends of the cord though a cord lock as shown in Figure 6. Knot one end to keep the cord from slipping back though the cord lock. Using a large pair of pliers or a vise, pinch one end of the S hook closed. Tie the other (unknotted) end of the nylon cord to the closed end of the S hook. This configuration can be adjusted in length from near zero (hook all the way against the grommet) to the full length of the cord (except for the length that loops through the grommet).
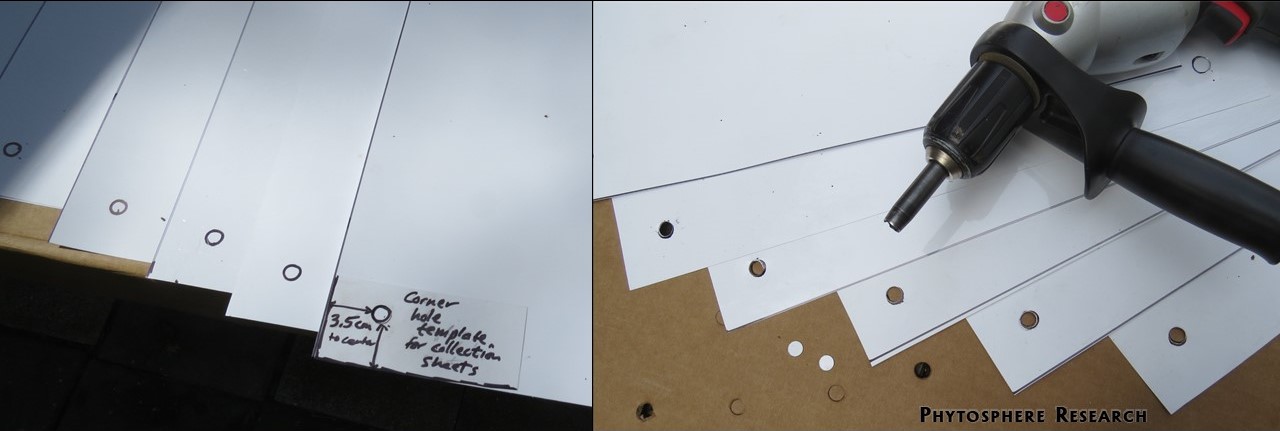 Figure 5. Holes in the corners of the collection sheets are centered 3.5 cm from each edge. A template made from a piece of flashing has been used to mark the hole locations (left). Holes can be punched with a 0.5 inch metal hole punch. At right, the punch has been chucked into a drill motor. When run at very low speed, the punch in the drill will cut the hole in the flashing. A piece of carboard is used beneath the vinyl to avoid damaging the punch.
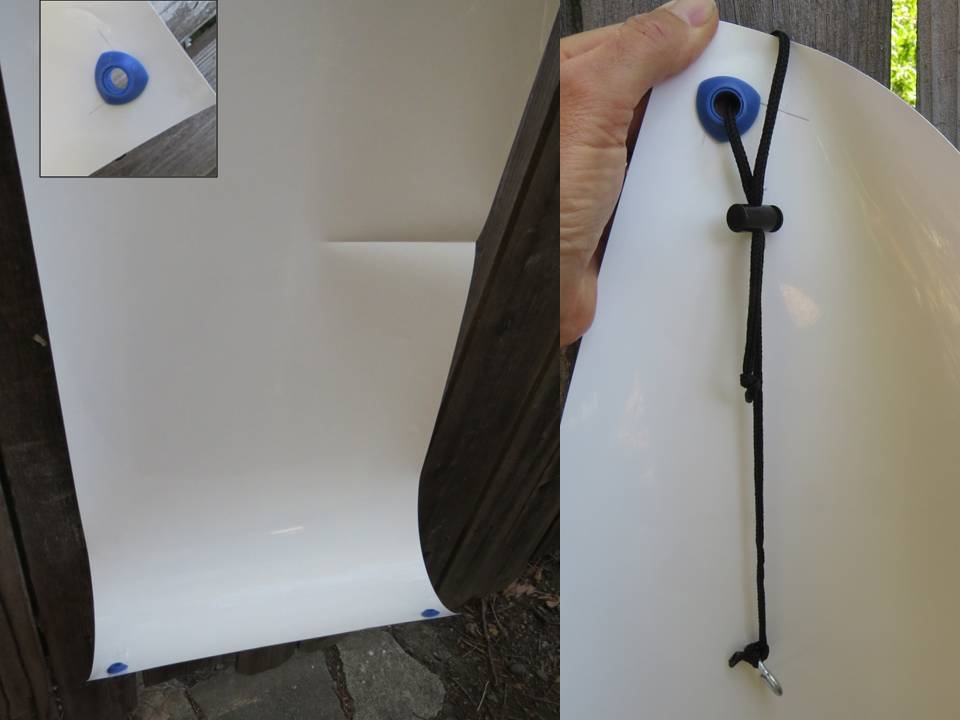 Figure 6. Collection sheet, showing grommets (inset and right) and placement of crease. Nylon cord with S hook can be tied through the grommet as shown for corners that will not need to be used to overlap with other sheets (the high corners of the upslope sheet and the lowest corners of the downslope sheet). Removable/linkable cords can be used on all corners as an alternative (Figure 9).
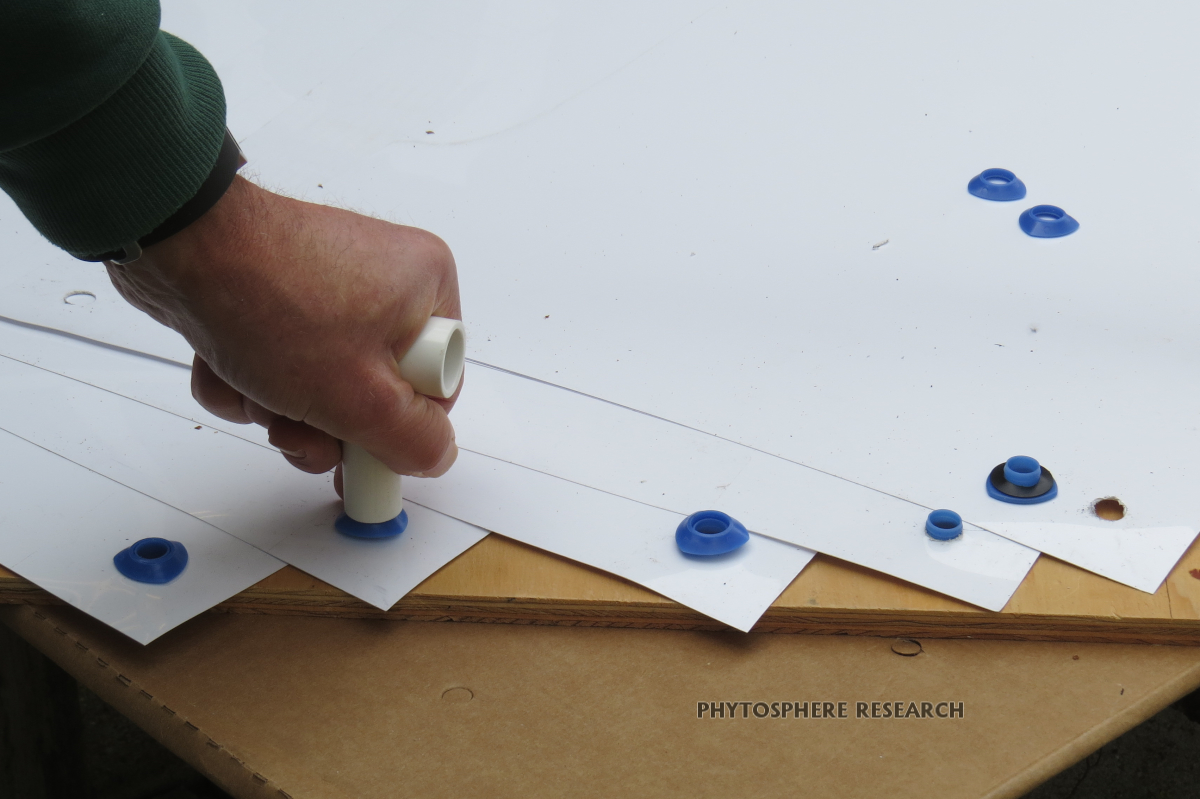 Figure 7. Installation of grommets into corner holes of collection sheets. The top portion of the grommet can be snapped in place with a 0.5 inch PVC tee with a short section of 0.5 inch PVC pipe in the tee joint. This method is a bit safer than using a hammer, which can damage the grommet if too much force is used.
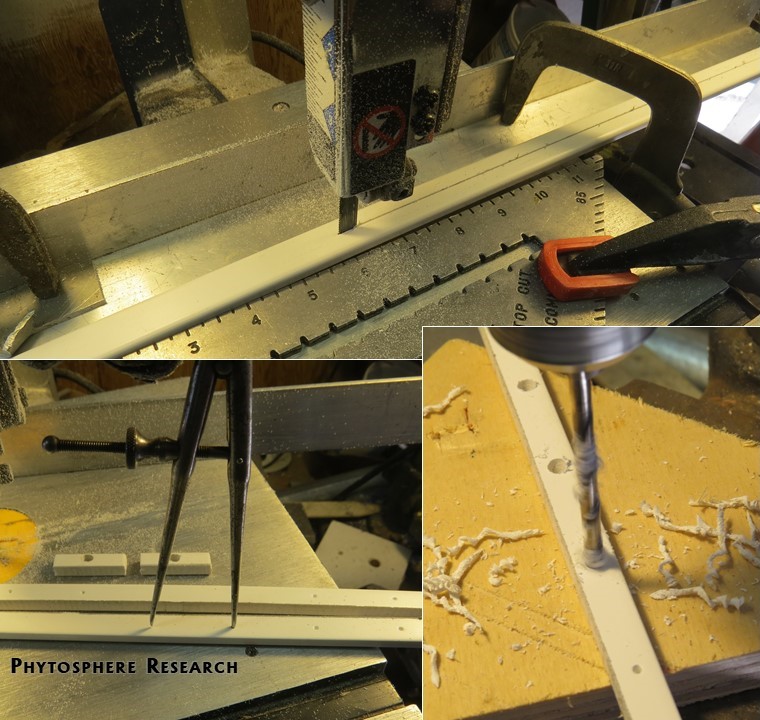 Figure 8. Steps in fabrication of cord ends from 3/4 inch wide PVC molding. The molding is ripped lengthwise down the center to produce PVC strips of the appropriate width, about 1 cm (top). At bottom left, holes are marked at 1.25 inch (3.18 cm) intervals on the center line of the PVC strips, before being drilled with a 0.161 inch diameter bit (4.1 mm or #19 drill). After the holes are drilled, the PVC strips are cut apart at the midpoint between the holes. Completed cord ends are seen in the background at lower left.
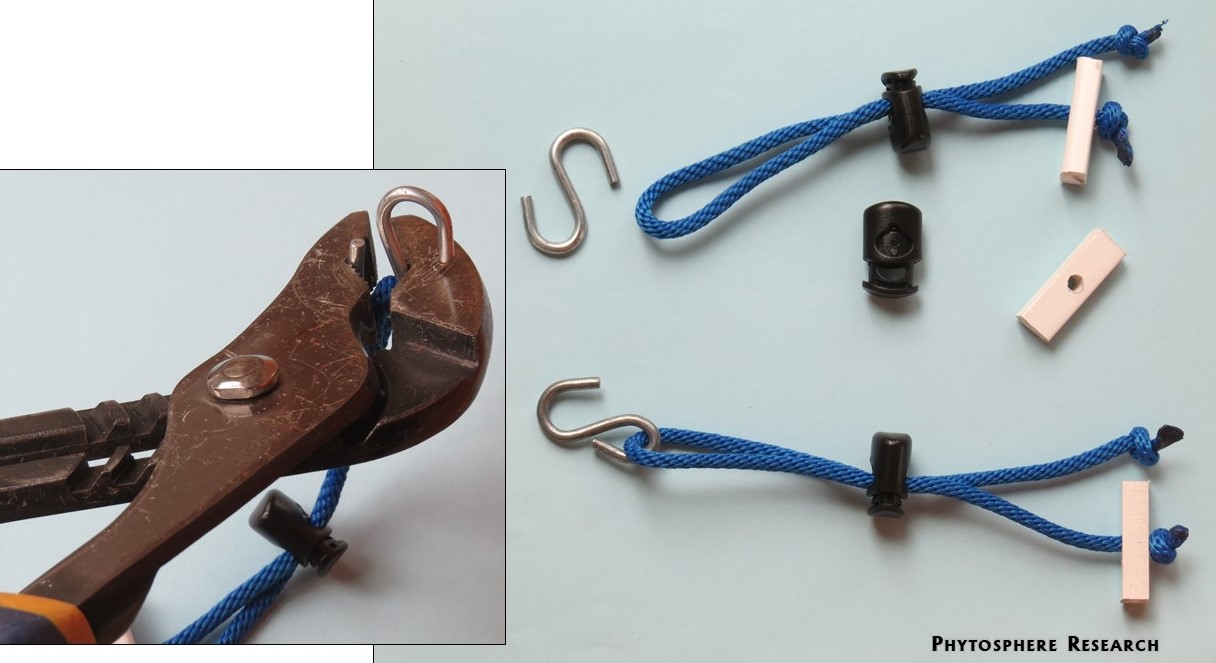 Figure 9. Configuration of linkable cords showing the S hook, cord lock, and cord end parts separately. The order of construction is: (1) loop the cord though the cord lock, (2) slip on the cord end and tie knots (3) pinch the S hook closed onto the loop in the cord (left).
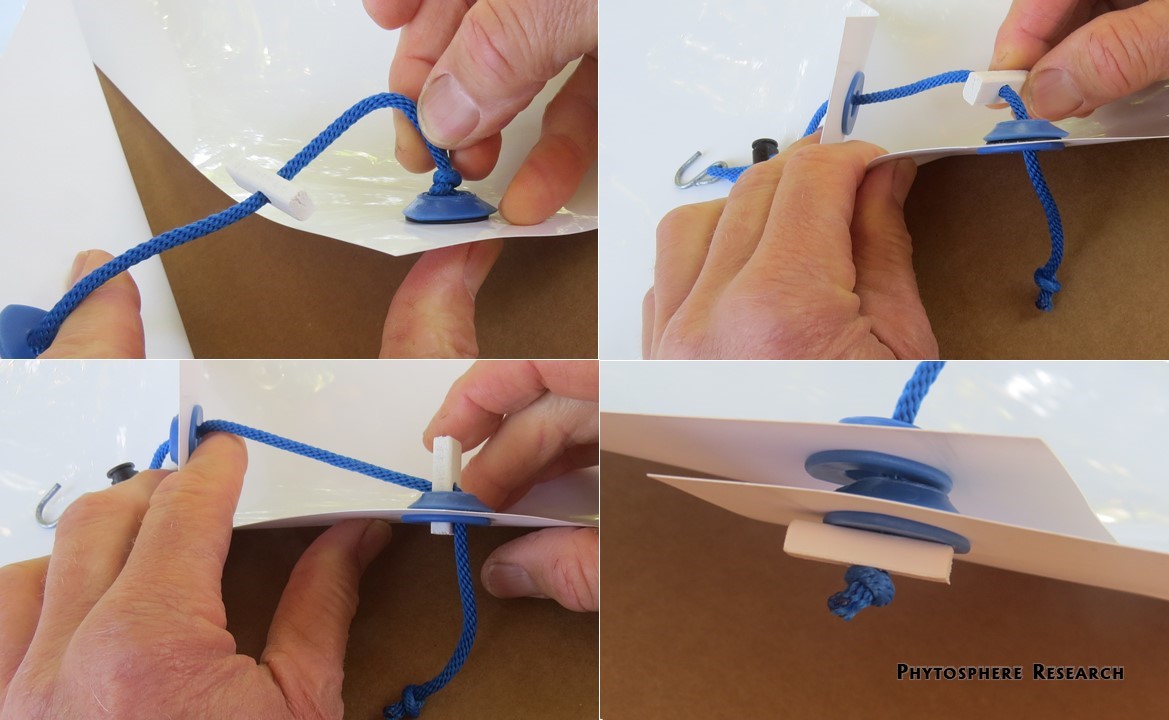 Figure 10. The PVC cord end and knot in the end of the nylon cord will not slip though the grommet hole together, so the knot is pushed through first (top left and right) before slipping the PVC piece though the hole (bottom left). When linking two sheets together as shown here, the downslope sheet (right side, bottom right) will be under the upslope sheet.
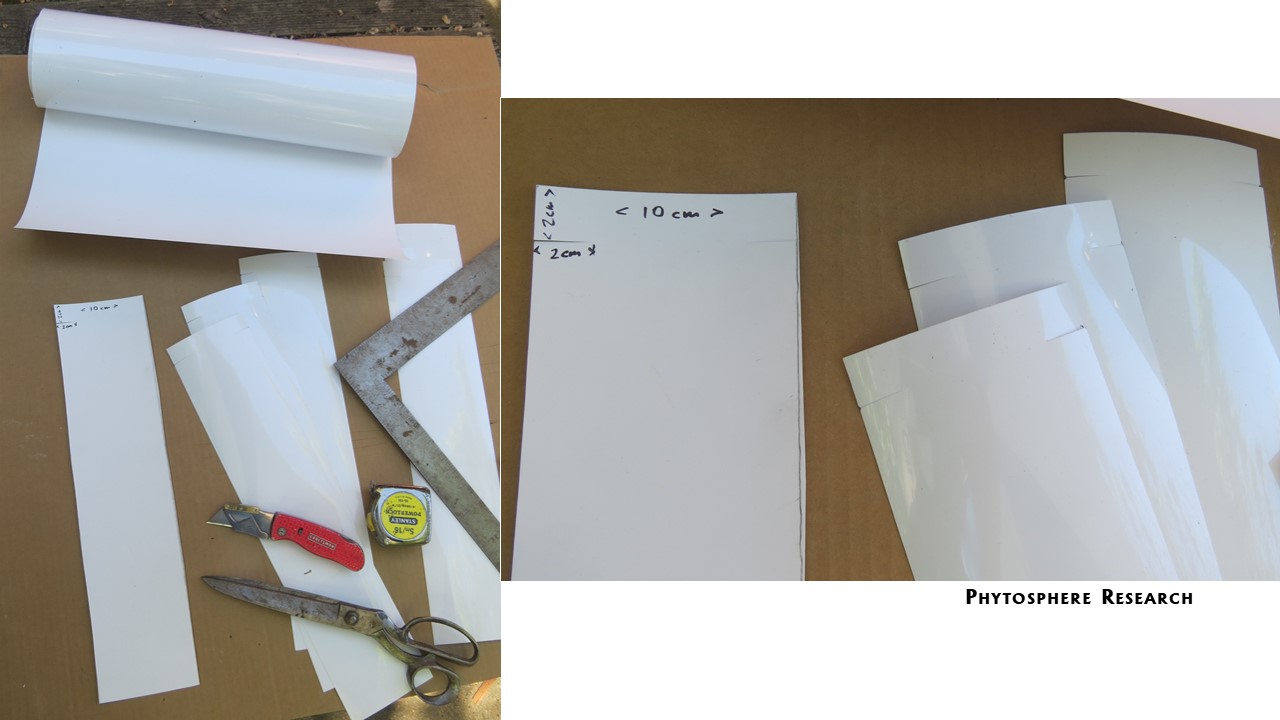 Figure 11. The flow deflectors are simply strips of vinyl flashing with slits cut near the top to make two tabs. The tabs attach to the PVC pipe dams on the underside of collection sheet.
 Figure 12. Use a pair of metal shears or a saw to make a small V-notch at each end of the slit in the PVC dam. Dams are much easier to slip onto the collection sheets if this notch is present.
Setting it up
- Struts and supports under nursery benches typically limit where collection sheets can be hung. On wider benches (4 ft=1.2 m or wider), it is often most convenient to span the width of the bench (Figure 13 ). If there is enough space between legs or supports, 2 or 3 sheets can be linked to provide a larger catchment area for large containers ( Figure 14 ). On narrow benches or on wide benches with at least 4 ft between supports, the sheets may be attached lengthwise along the bench, with the downslope edge facing the aisle ( Figures 15, 16 ).
- Slip the slit PVC pipe dams along the downslope edge of the sheet, leaving a gap of about 4 cm on each side of the central crease. These pipes make the edge of the sheet more rigid and serve as a dam to help direct the runoff into the center of the crease. It will be easiest to slip these on if you start at the edge of the pipe at the corner of the sheet and slip it straight along the edge (Figure 17 ). If you will be using two or more sheets linked together, the PVC dams will only be attached to the downslope sheet.
- To avoid contaminating the sheet, don't let the top or edges of the vinyl flashing contact the ground when you are attaching it. Have one person on each side of the bench when setting up to support and attach the vinyl flashing. For wide benches, you can attach one of the sheet's cords to one end of a clean rod or pole to help support the sheet as it is passed under the bench to the other side. Having the PVC dams attached also makes the sheet more rigid so it can pe passed under the bench easier. Attach the hooks on the cords to the bench mesh to suspend the sheet. If necessary, you can also hook the cords to trays or containers on the bench ( Figure 18 ).
- If installing multiple linked sheets, attach the the upslope sheet first, glossy side up and crease on the downslope end. The second (downslope) sheet should have no cords in the grommets on the upslope edge. Place the upslope edge (no crease) of the second sheet under the downslope edge of the first sheet. Line up the holes in both sheets and insert the cord ends of upslope (top) sheet through the grommets of the second sheets (Figure 10 ). If a third sheet is used, repeat the above procedure, overlapping the second (middle) sheet over the third (downslope) sheet.
- As needed, reposition the hooks or use the cord locks to adjust the height of the sheet(s) so they will drain toward the collection vessel. If using multiple sheets, make sure there are no gaps at the junctions between the sheets. Run some water on the most upslope sheet to make sure that there is no leakage at the overlap and that all runoff is channeled into the gap between the dams. Make sure that there is enough room at the low end for the zoospore collection vessel (ZCV). If there is a large gap (more than 6 inches [15 cm]) between the bottom of the collection sheet and the top of the ZCV, lower the dam end of the sheet and/or elevate the ZCV by placing it on a short platform, e.g., block, inverted tray, etc. (Figure 19 ).
- Before putting the zoospore collection vessel in place, put the flow deflector into the ZCV so that the bottom (end without the tabs) is flat against the bottom of the ZCV. Place a labeled pear bait at the bottom of the ZCV on top of the end of the deflector. Place the ZCV under the gap between the dams on the low end of the collection sheet(s). Slip the deflector tabs into the bottom half of the PVC pipe dams under the low end of the collection sheet. You may need to slide the dams closer together or further apart to get the tabs to fit. Adjust the position of the ZCV as needed to make sure that leachate water will flow smoothly down the deflector into the ZCV and any drips from the low edge of the collection sheet will fall in the ZCV. Also check to see that the pear is still above the deflector and will not be held down by it. The pear needs to be floating during the test, so it is important to make sure nothing is likely to trap it at the bottom of the ZCV. During the test, check to make sure the pear is floating as soon as there is enough water in the ZCV to float it.
A video of the collection system in action during a test can be seen here.
 Figure 13. Installation of a single collection sheet spanning a 4 ft (1.2 m) wide bench from side to side.
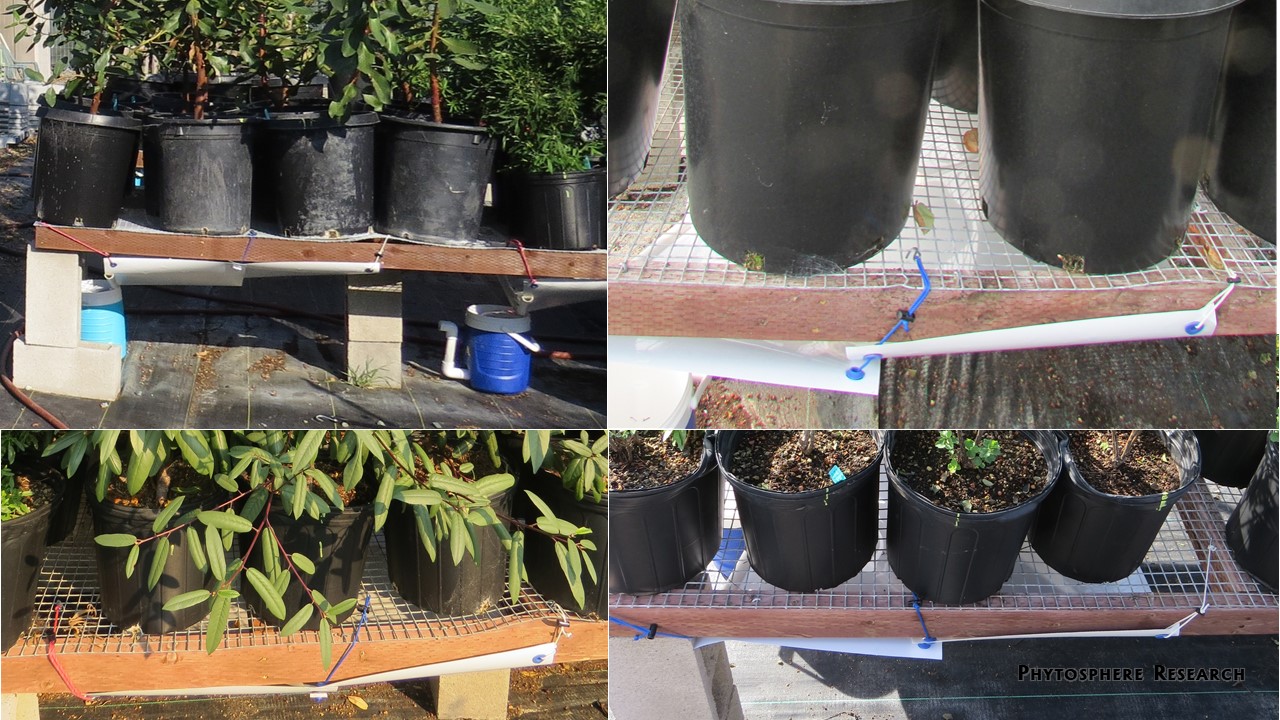 Figure 14. Installation of two linked collection sheets spanning 4 ft (1.2 m) wide benches from side to side.
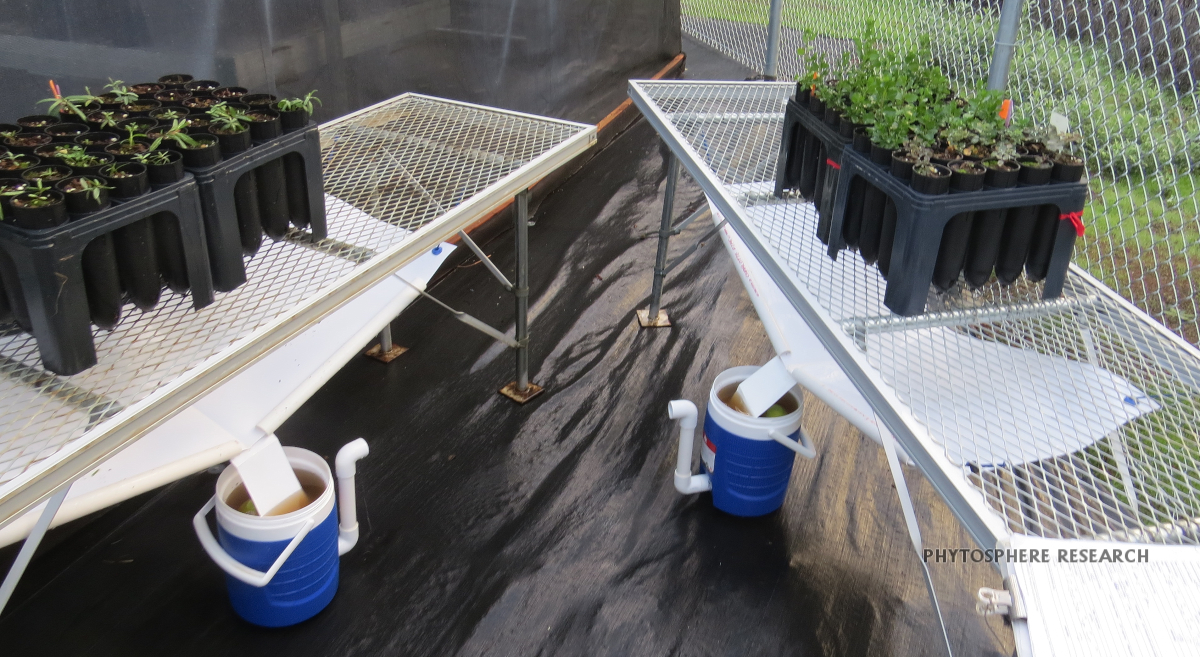 Figure 15. Installation of single collection sheets lengthwise along narrow benches.
 Figure 16. Installation of two linked collection sheets lengthwise along a wide bench. Sheets are sloped to drain toward the aisle.
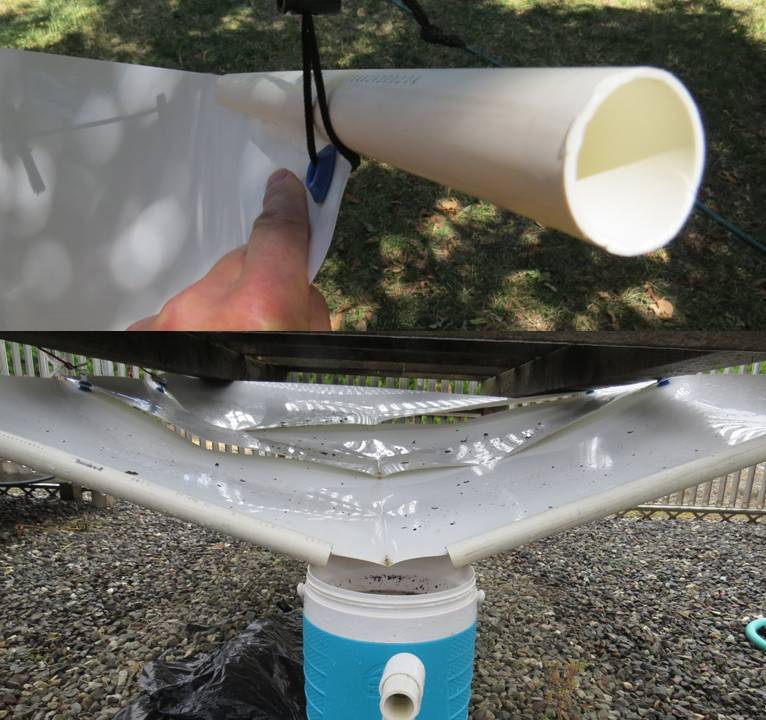 Figure 17. Slitted PVC pipe dams are easier to slide onto the edge of the flashing sheet if you start with the end of the pipe at the corner and slide straight down as shown in top image. Bottom image shows dams in place without a flow deflector attached. This image also shows three sheets used in series.
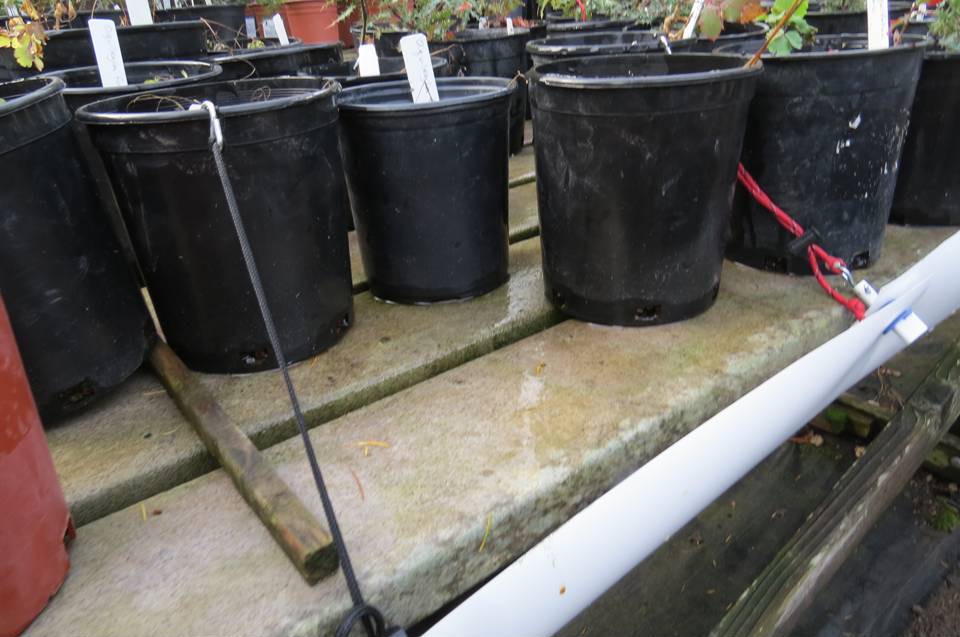 Figure 18. Cords can be hooked to containers if there are no places to hook on the bench top. The type of bench top shown here is not compliant with the Nursery Phytophthora BMPs because water can run along the boards, increasing potential for cross contamination. Note - this image shows our original hardware for linking multiple sheets.
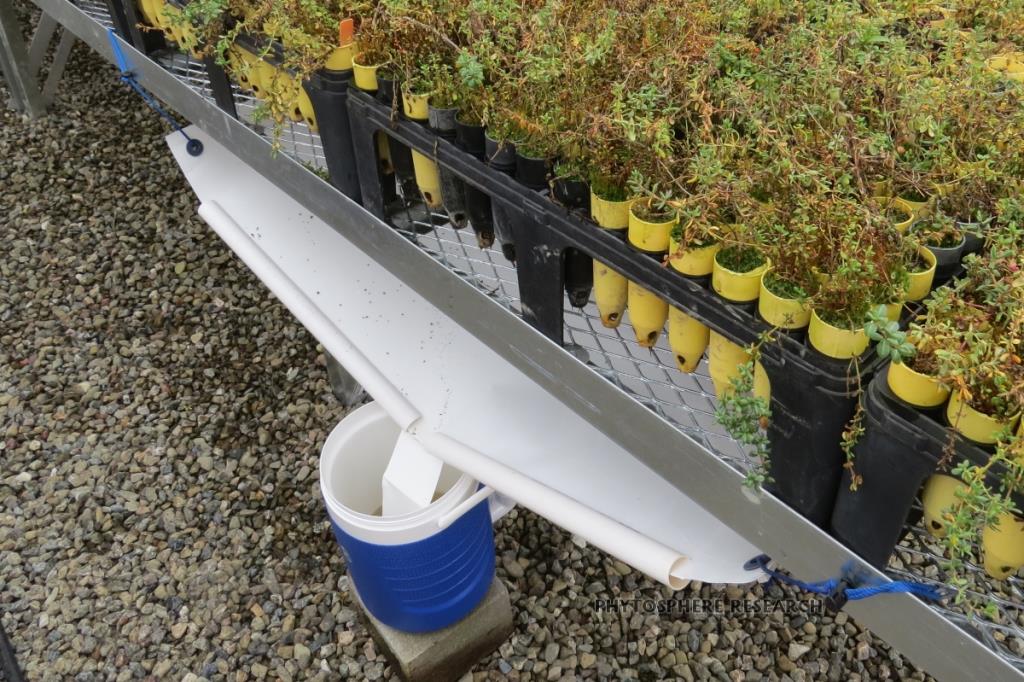 Figure 19. Cinder block is used to elevate the zoospore collection vessel (ZCV). Sheet is mounted along the long axis of the bench. ZCVs are easier to access when along the aisle, but more care is needed to avoid knocking them over when pulling irrigation hoses. For this reason, it is helpful to point the ZCV outflow away from the aisle, as shown here.
Mini ZCV - A Zoospore Collection Vessel for small volumes of leachate
The mini ZCV can be used for collecting and baiting small amounts of leachate, from just over 2.7 L up to between 6 and 8 L. For volumes of 2.7 L or less, the drain used in this ZCV is not needed. For volumes more than about 6 to 8 L, use a standard ZCV (above). Tests that generate the amount of leachate appropriate for the mini ZCV include (1) bench leachate tests conducted with low numbers of small containers or (2) leachate type individual container tests on containers up to about #2 ("2 gal", about 6.3 L actual volume).
Materials needed
Note: ID=inner diameter, FPT=female pipe thread, MPT=male pipe thread- 1 gallon (7.6 L) heavy duty zip close plastic bag
- One 1/2 inch (2.54 cm) ID PVC slip-slip elbow
- One 1/2 inch (2.54 cm) PVC FPT- slip elbow
- One 1/2 inch (2.54 cm) MPT-MPT polyethelene cut-off sprinkler riser (easier to thread into the elbow than a piece of threaded PVC).
- Two sections of 1/2 inch (2.54 cm) PVC pipe - preferably schedule 40: 4.25 inches (10.7-10.8 cm) long. All slip connections are held together by friction only.
To assemble a mini ZCV, press the two elbows onto one of the PVC pipe sections so that they point in opposite directions (Figure 20). Hold the FPT (threaded) elbow opening against the middle of the outside of the plastic bag about 5-6 cm (2-2.5 inches) above the bottom seam of the bag. With your other hand holding the cut off riser inside the bag, line up the MPT threaded end of the riser with the FPT elbow and thread it in though the side of the plastic bag. The plastic bag will deform at the point that this is happening. When you finish tighening the riser, the slip-slip upper elbow should be near the top of the bag. As you tighten the riser into the elbow, the plastic may tear inside of the joint or it may simply stretch, leaving the connection plugged by a stretched layer of plastic. Insert a thin knife or similar sharp tool down the inside of the cut-off riser and cut away any of the plastic that blocks the threaded coupling. A flap of plastic can be left, but make sure that the hole is wide open so that flow will not be restricted.
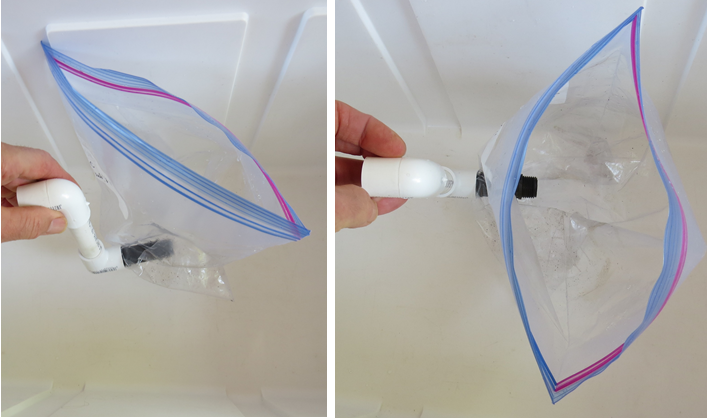 Figure 20. Partially assembled mini ZCV. The cut-off sprinkler riser is threaded into the PVC FPT elbow through the side of the plastic bag. Cut away any of the plastic bag inside of riser-elbow joint that blocks flow though the joint, as described above.
Place the bag with the attached pipe into a second 1 gal plastic bag. This is needed to contain any minor leakage that may occur at the threaded joint. Then place the entire assembly into a plastic container that will support the bag when it is filled with water (Figure 21). Arrange the mini ZCV so that the cut off riser is at least 2 cm above the bottom of the bag. Insert the other length of PVC pipe into the upper elbow and extend it over the edge of the supporting container. Then pull up the top edge of the inner bag so that it extends at least 4-5 cm over the top of the upper PVC drain pipe. The outer plastic bag will need to be pushed or folded down so that drain pipe can be kept below the rim of the inner bag (Figure 21). At this point, the labeled pear bait can be placed into the inner bag and the mini ZCV is placed directly under the containers being leached or under a small collection system (Figure 21).
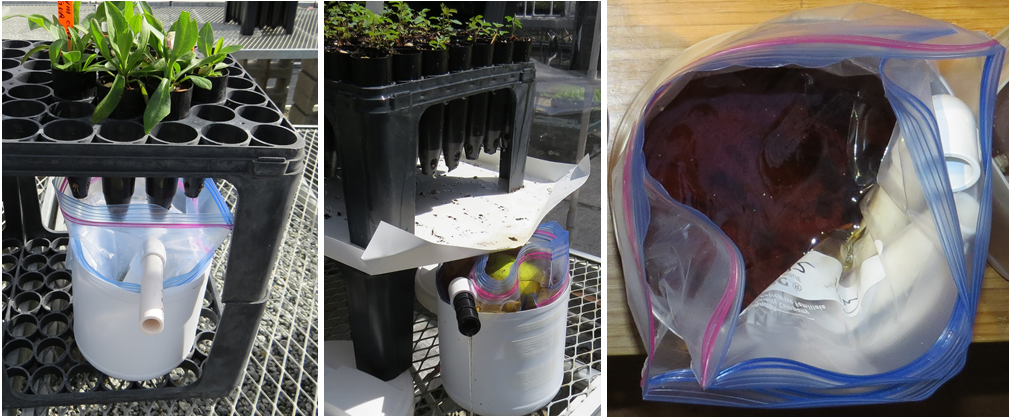 Figure 21. Left - Completed mini ZCV ready for use. Containers in this test drain directly into the inner bag. Center - Mini ZCV in use. A small, sloped vinyl sheet with creased edges is used to collect and direct water into the ZCV. Note overflow from the drain pipe (a second cut-off riser in this example). Right - mini ZCV after incubation with pear removed. The PVC outflow pipe was removed and placed between the 2 bags for transport. Note that the level of leachate in the bag is below the level of the upper elbow, preventing overflow though it.
After leachate collection is completed, tilt the mini ZCV slightly to allow the water level to drain about 2 to 3 cm below the outflow drain. Remove the upper PVC drain pipe; it can be stored in the supporting container or between the 2 bags for the time being (Figure 21, right). Adjust the mini ZCV so that the upper elbow is positioned well above the water line (Figure 21, right). Unfold the outer bag edge above the level of the elbow. Before moving the mini ZCV, close both bags to prevent splashing. When the mini ZCV has been moved to where incubation will occur, open both bags, making sure that the top edges of both bags are above the top PVC elbow. After incubation is completed and the pear bait has been removed, the cut-off riser can be unscrewed from the pipe and these parts can be sanitized with freshly diluted bleach (0.5% sodium hypochlorite for at least 2 minutes) for later reuse.
10/06/2020 - Added new link for updated ZCV construction video and made a few assocaited edits where ZCV assembly is discussed
12/11/2019 - Added link for directions for constructing an irrigation wand to equipment needed list.
9/29/2019- instructions for making the mini ZCV added
4/30/2019- expanded the writeup with additional pictures and details, modified design of ZCV and collection sheet attachments to make construction simpler.
return to Phytosphere gear page